

Electric Fencing: Troubleshooting
ID
SPES-692P
 EXPERT REVIEWED
Introduction
While proper installation of an electric fence and grounding system will minimize problems, downed trees, heavy vegetation, broken components or other issues can lead to poor performance. This publication, one of a series on Electric Fencing, reviews how to troubleshoot issues with low fence voltage or a nonfunctioning fence.
Fences should be routinely kept at a minimum of 3,000- 5,000 volts for cattle or 7,000 volts for sheep. Factors such as soil moisture or a vegetation load on the fence can cause fence voltage to fluctuate throughout the year, so it is a good idea to purchase a voltmeter and periodically test your fence before any issues arise.
This will give you some idea of how hot your fence is throughout the year when it is working properly.
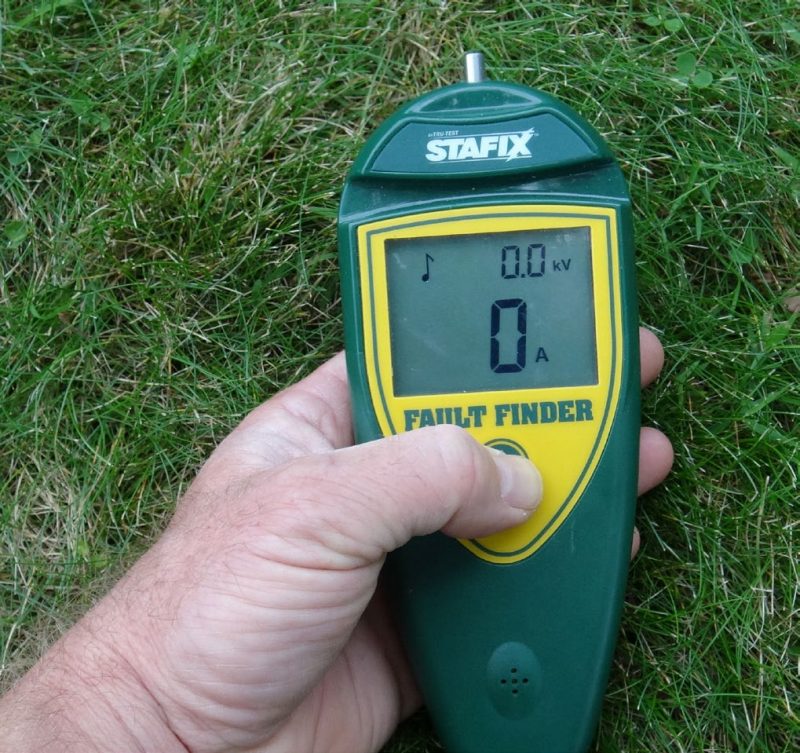
Several types of voltage testers can be found on the market. Some have only a series of lights that indicate relative fence voltage, which is not very helpful for accurately measuring volts or drops in voltage on a fence. Purchase a voltmeter that provides a numerical reading in volts or kilovolts (one kilovolt, or kV, equals 1,000 volts). Some voltmeters, usually called fault finders, also read amps in addition to volts (fig. 1). Often the amp reading on fault finders will be accompanied by an arrow that points in the direction of a fault.
Initial troubleshooting steps
To troubleshoot a reduction in fence voltage, follow the steps below first.
Do a quick survey for any obvious faults on the fence, such as downed trees or wires that have come loose from an insulator.
If no obvious fault can be found, test the energizer to make sure it is functioning properly. To do so, turn off and unplug the energizer from its power source. Unhook the wires from both terminals of the energizer. Plug in and turn on the energizer. Using a voltmeter, place the testing probe on the positive terminal and place the earth/ground lead on the negative terminal. If the energizer is working properly, it should pulse with about 7,000-9,000 volts. If not, the issue could very well be with the energizer. Check any fuses on the energizer and look for any black carbon deposits indicating lightning damage to internal components. If deposits are visible, the energizer will likely need to be repaired or replaced.
If the energizer is working properly, check the grounding system connections and wire, energizer lead-out wire, lightning diverter, and connections to the fence. It is not uncommon for a grounding system to require additional ground rods if:
- You originally installed and approved the grounding system during wet weather and are now experiencing a drought.
- You have replaced the original energizer with a larger one.
- You could not drive the existing ground rods deep enough. Most energizers require three ground rods driven 6 feet deep.
If no problems are found with the energizer, grounding system, or lightning diverters, you will have to begin a more precise survey for faults on the fence. To aid in fault-finding, it is helpful to first understand what voltage and amperage are.
Understanding voltage and amperage
Voltage is a measure of the energy difference between two objects — in this case, the energy difference between the electrified fence wire and soil. Moving energy, or current, is measured in amps. When no objects act as a bridge between the wire and the soil, there is little current flow (low amperage) and the energy difference (voltage) between wire and soil is high. Some amps will usually be present on the fence even under ideal circumstances due to induction and minor flows in the system. This will typically be in the range of 1 or 2 milliamps. But if you see a major drop in voltage accompanied by a significant increase in amperage, it’s most likely because there’s a major flow of current somewhere on the fence, such as a wire touching a metal T-post, a cracked insulator, or a section of downed fence. Amperage readings in the zone of a fault commonly read 10 to 30 milliamps or more, depending on the size of the energizer and the magnitude of the fault.
Fault-finding
Starting at the energizer, begin testing the fence with your voltmeter or fault finder, especially on both sides of critical points such as gates or lane crossings. Bear in mind that voltmeters or fault finders are only able to read about a hundred feet or so in either direction. On multiple-wire fences, be sure to test all hot wires. Check for poor connections and joints, and broken wires or cutout switches that are arcing. It’s important to note that over time, it is possible that friction with rocks can wear through the insulation on buried wire — which is why you should always sleeve insulated wire in conduit when crossing under gates or other high-traffic areas.
Arrows on a faultfinder will point in the direction of the flowing current (the fault), but this also is limited to a hundred feet or so in either direction. Voltage and amperage will normally vary as you go along the fence, but if you get a low voltage/high amperage reading in one section of fence followed by high voltage/low amperage reading in the next, it is an indicator that you have passed the location of the fault. Take advantage of any cutout switches on the fence to isolate and test smaller areas.
Stray voltage
Stray voltage is a low level of nonlethal current in animal housing, bulk tanks, silos, gates, waterers, etc. It can be a major problem in operations where animals are kept in confinement. Stray voltage can cause changes in animal behavior resulting in stress and lost performance. Behavior changes can include flinching, avoidance of waterers, and reluctance to move in and around parlors, buildings, or gates. Feed consumption may be reduced. Milk yield in dairy cattle is often depressed because cows don’t milk out or take longer to milk. Somatic cell counts and clinical mastitis may increase. Of course, these symptoms can be caused by other things, but stray voltage can be the culprit.
The source may originate on the farm from problems with wiring, motor faults, or issues with electric fences, faulty fluorescent lights, telephone grounds, watering systems, silo unloaders, unbalanced neutral loads, bulk tanks, and many other possibilities. The source may also originate off the farm from issues including utility company grounds and neutrals, power transmission lines that end nearby, or faulty grounds from adjoining properties. Stray voltage can be a complex problem to investigate and requires the assistance of a certified electrician. From an electric fencing standpoint, however, the following guidelines should be helpful for operations where animals are confined.
- With confinement operations, never install an electric fence energizer in or near the milking parlor or livestock buildings; the metal of the buildings can affect the energizer’s performance.
- In a confinement setting, don’t install an energizer larger than 15 joules. If needed, use multiple energizers at different points on the farm (not connected to the same fence) rather than relying on one large energizer.
- Maximize the efficiency of the fence’s grounding system by using enough ground rods and locating them in damp soil.
- Fix any fence shorts as soon as possible to prevent voltage from potentially building up on the energizer’s grounding system, which could bleed to a nearby farm building.
In cases where the cause of stray voltage is from the utility source and additional ground rods added to the transformer pole do not alleviate the problem, talk to your utility provider about modifications to the transformer pole. This involves installing a new transformer with isolated primary and secondary windings, removing the connection between primary and secondary grounds, and providing a separate secondary ground and an arrestor between grounds.
General tips for constructing an electric fence
- Use 12 ½ gauge high-tensile wire with a Class 3 galvanized coating. Class 3 wire has roughly three times as much galvanization as Class 1 wire, which means greater conductivity and longer life expectancy of the wire.
- Use quality wire clamps or crimps for all wire connections rather than hand wrapping if possible, especially for energizer lead-out wire and jumper wires.
- Do not use copper in electric fencing systems. Connecting copper to other metals such as steel will quickly result in corrosion, as will the use of copper in a pulsed electrical system. The result is a reduction in the fence’s performance.
- Use only insulated fencing wire/lead-out cable manufactured specifically for use in going through buildings or under gates. Residential electric wire is not adequate to carry high voltage and will burn up, causing electrical shorts. Consider using high- conductive aluminum lead-out cable.
- Electric fences should always have a separate grounding system at least 33 feet from utility poles and any residential or farm grounding systems.
- All hot wires on a multiple-wire fence should be connected at the beginning and end of each run of fence. This reduces overall electrical resistance for a hotter fence and allows the current to go around shorts in the fence. All ground wires in a continuous ground or earth return system should also be connected at the beginning and end of each run of fence. Consider using high-conductive lead-out cable to optimize conductivity when connecting multiple fence wires or feeding electricity underneath gates.
- Consider installing cutout switches to enable sections of fence to be isolated for troubleshooting, or to minimize the amount of fencing the energizer must electrify (e.g., part of the farm can be turned off when not in use). You may also wish to use a cutout switch to remove power from a fence’s bottom wire during heavy grass loads.
Acknowledgements
Thank you to the technical reviewers for this publication: Steve Jones, Conservation Specialist, John Marshall Soil and Water Conservation District; Sydney Beery, Sydney Beery Electric Fence Energizer Repair; Phil Blevins, Extension Agent, Washington County; Scott Jessee, Extension Agent, Russell County; and Thomas H. Ewers, Professional Engineer.
Virginia Cooperative Extension materials are available for public use, reprint, or citation without further permission, provided the use includes credit to the author and to Virginia Cooperative Extension, Virginia Tech, and Virginia State University.
Virginia Cooperative Extension is a partnership of Virginia Tech, Virginia State University, the U.S. Department of Agriculture (USDA), and local governments, and is an equal opportunity employer. For the full non-discrimination statement, please visit ext.vt.edu/accessibility.
Publication Date
May 13, 2025
